30 Mar 2017

Roboute Guilliman WIP mock ups and a third one

Hi Readers! thanks for checking out our blog!

This post is to follow up on my previous Roboute Guilliman post.

I've started building the 2 models, and thought I'd share a few comparisons of the 2, and a few potential conversion mock ups.

Firstly here are the 2 models side by side, the plastic version appears to be quite a bit larger than its Forge World twin.
 However the difference isn't so dramatic side by side.
 Of the two bases I like the Forge World version, its more 'statesman' as GW like to call Roboute, I would be tempted to use this base with the plastic version if the body position was better- the conversion in last months White Dwarf is nice, but I don't feel its a natural pose, and I'm not keen on the position of the left arm in it.
 The swords, well, there is only one winner here..
 The left arms are similar, the option to build the heavy bolter under the Forge World arm is an possibility, but then you have a sheath too small for the Emperor's Sword.
 The Heads are similar, the Forge World reminds me of 'the head' that I think was in a UK child's programme, 'Art Beat' from the early 90's.

Mock Ups- below are 2 versions with a combination of the 2 models, I do really like the overall look of the model (wrong head- this is the Grey Knights head from the GoS3 set) I am tempted to try and do this version at a later date, but I'd like to have the options of a 30k Guillliman and the 40k version.  But the look and pose I feel looks right for what they are doing with Guilliman in 40k.


Whats that? a third Guilliman??? This is a version I picked up a while ago, which doesn't look to bad as an alternative to the Forge World/GW ones. The kit has options for sword and bolter, or the fists of Macragge (Poor Marneus) or a combination of the two for the 40k configuration.

Thanks for looking!

28 Mar 2017

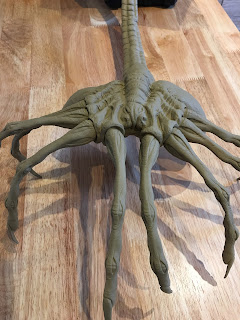
#MonsterMarch - Facehugger Week 3(ish)

Hi everyone - the final week of #MonsterMarch and I can unveil the last steps and finished work. For everyone else's updates, check out the Swordmaster of Hoeth blog here.

So when I left off, I had gotten down a base layer, initial wash and first over/dry-brush. From there I then gave the model a wash in Agrax Earthshade to add more shadows and darken the overall scheme.


Then it was back to the drybrush steps, first up a dry brush of Tallarn Sand again to take us back to the primary base colour.


Then a lighter dry brush of Karak Stone.


Finally a very light drybrush of Ushtabi Bone - just for some highlights. At this point the skin is pretty much done. I used some thinned blue wash to paint on some veins on the bladder-y bits (??? no idea what else to call them) and brushed again over them with Ushtabi Bone just to make them look like they are below the layer of skin. Not completely sold on the effect - but it looks ok.


For the 'mouth' area, I had been drybrushing the same as everywhere else and just gave it a wash of Crimson Carrionburg and Reikland Fleshshade - which is my go-to wash recipe of red fleshy bits.


The nails were painted in the same body colours - loosely blending into each other.


Once everything had dried, I hit it up with a matt varnish and then gloss varnished the 'mouth' and nails to give the a wet and shiny look.


Job done!

Thanks for reading - hopefully this will get me back into painting smaller models now - we'll see...


25 Mar 2017

Terrain and Scenery - Rubble - Using those sprue offcuts

Hi Readers, if you are like me you'll have plenty of sprue leftovers and those red range rulers from certain box sets. Well, don't throw it all away, use it all to improve your scenery.
Here I have a pot where I occasionally chop up and place bits of old kits, sprue offcuts and now those range rulers I had in a box set and never used. So, recycling unwanted offcuts and range rules...
This provides me with the raw materials needed. Larger 'bricks' from the range rules...
Smaller 'bricks' from the sprue offcuts, I tend only to use the straight bits, not the curved or text stamped bits, there is plenty of straight sprue pieces especially with the Rhino kit! Loads of nice straights, some of which you can save for reinforced iron bars in buildings etc.
To use them, simply pour some PVA (Elmers) glue and then pour over the bricks, this provides the random pattern. Once the glue is dry (about 4-8hrs or overnight) I then liberally apply Plastic Cement where the bricks meet eacth other giving a strong bond. Then spray, paint whatever you do to colour your buildings. These Shrine of the Aquila were sprayed Zandri Dust, washed Agrax Earthshade and drybrushed Ushabti Bone.
Here I have used some rubble to extend the pile of rubble from Battlefield in a Box, on the base of a Pegasus Hobbies Gothic Church building. These were codex dry, drybrushed Administratum Grey.
And finally, some rubble around the ends of the Ruins adds some realism and interest I reckon. These Abbadon Black, drybrushed Grey and the effect  is improved with heavy drybrushes and over brushes of the colours you use for the bases, in this case, Mournfang Brown, Kommando Khaki (not sure of new name) and Ushabti Bone.

Hopefully this is a nice hobby life hack if you didn't know it already ;)  Cheers, Siph.

23 Mar 2017

Bloodthirster / Skarbrand The Exiled One - WIP #2

 Hi- thanks for dropping by!

Up today is an update on my WIP Bloodthirster and Skarbrand that I posted a few weeks ago.

I'm making steady progress with the two- I' looking at one final level of extreme highlights for the skin to pick up the muscle definition, and then to detail the feet and ankles. The bases needs a final dry brush to highlight also.

 Skarbrand's face has had a lot of attention to pick out the detail. I'm still need get the eyes and horns done, I think for the damaged horns I'm going to finish them with a black edge- again trying to show that the horn has necosis,  like I've done with the wings. The good, 'healthy' horns will be completed with a lighter edge as a contrast.
Thanks for looking!

20 Mar 2017

Necron Ghost Ark - or "How I learned to hate line highlighting..."

Hello Readers, thanks for dropping in. Here is the latest and most colourful addition to the Necron Dynasty. A decent transport choice for the Necron Warriors, with repair boosts and durable Quantum Shielding.
The Gauss Flayer Arrays can independently fire broadsides at different enemy units, so this transport is good for driving up in between enemy units and hitting two from the sides, not forgetting Gauss can glance vehicles to death!
I love the look of this vehicle, unique to the Necrons and really cool looking, but the sub-title says it all - oh my, I thought drop pods were bad enough, but this takes the crown - each rib had to be line highlighted, there is no 'inside' to this vehicle, everything including the occupants is on show!
I painted this in sub assemblies, the ribs separately, the Command Throne, the console, the driver, the passengers, the largest crescent and the engine intakes with (now partially obscured) fine gold detailing ankh... but the line highlighting took forever. Some ofthe largest bits were drybrushed but the inner details and ribs were all patiently highlighted.
That said, it gave me a great sense of achievement and satisfaction when finally constructed and finished. I think it looks pretty darn awesome, would I paint another one - I'll wait to see how it performs on the battlefield. But I'm sure I will grab a Doomsday Barge eventually, so more ribs to do in the future. That said not for now, this is a definite one ticked off the to-do pile, its been a long time waiting in undercoated sub-assemblies, feels good to complete it.
Here is a close up of the crew and passengers, and the repair scarabs busy repairing the damaged/wounded exo-skeletons of the embarked Warriors.
And the driver, come Lord overseer whose depleted ranks are getting repaired and back into the fight!
Finally, a scenic shot, thanks for reading this far! Cheers, Siph.

17 Mar 2017

#MonsterMarch - Facehugger Week 2

Into week 2 now of #MonsterMarch and all is going well so far... You can check out other peoples updates on the Swordmaster of Hoeth blog.

Last week I managed to get the facehugger model all built, filled and prepped for painting. Normally in the past the painting steps I have gone through this week would have been done in an hour or two - but a) I'm still not back into my rhythm yet and b)painting something of this scale is pretty tricky - it takes about an hour to do one complete pass of the model - and then there are difficulties like trying to hold the thing. Also - soooooooooo much paint is being used (which isn't cheap when it's all GW stuff...)!

So I started out by giving the model an undercard in Zandri Dust - I have a paint recipe for fleshtones using 'sand' colours, so this was an ideal start.


Next up was a base coat in Tallarn Sand.

At this stage I got a bit confused and forgot my paint recipe - I know all the individual colours, but can't remember the order of some washes/coats - so from here on out we'll see how it turns out...

Gave the facehugger a coat of Reikland Fleshshade and wow - the detail immediately popped and the model started coming into its own.

After the initial wash, the entire model got overbrushed with Tallarn Sand again and that is as far as I've got. Looking pretty good so far though - don't you think?


Next up is another wash and then a few drybrushes and most of the flesh will be finished.

15 Mar 2017

Roboute Guilliman - Primarch of the Ultramarines

Hi one and all,

Quick post, I've started work on my two Roboute Guilliman models, one the new GW plastic, Lord Commander version, the other the  Forge World 30k model. I think it'll be a good process to do the two models simultaneously and compare the two versions.
 The FW version (Thanks 6th)
 The two sprues for the plastic version with the new 'armour of fate'.
There is part of me that likes the idea of converting the two sets, I like the look of the FW pose, maybe with the new backpack and sword, however I'm going to stick with the 2 models as they are.

Hopefully we'll get some good weather so I can start spraying the Reaver titan for next weeks post...

14 Mar 2017

Necron Destroyers #7 #8 and #9 - Destroyer Cult Finished

So, after a disastrous battle where a Skyhammer annihilated all my AP3 weaponry, (got to hate Drop Pods of Grav Devastators backed up with podding Grav Centurions... hmmm...Skyhammer should at least account for some of the Drop Pod Assault number Pods!) I thought it was about time to up my Destroyer numbers for a nice bonus when I can field a Destroyer Cult.
For these final three Destroyers I wanted a slightly different look to the other six, so I tried a half tone scheme with big transfers on the plain metallic side too. I think it looks great.
I followed the usual reddish gauss energy colours and the new Fulgurite Copper on the capacitor coils.
These finish off the numbers needed for the Destroyer Cult, three squads of three plus the Destroyer Lord. The Cult gains the benefits from the formation (re-roll failed to wound rolls and failed armor penetrations rolls in the shooting phase), combined with re-rolls of 1's to hit because of Preferred Enemy Everything! The only restriction is three units of three Destroyers, one Lord and 0-1 Units of Heavy Destroyers.
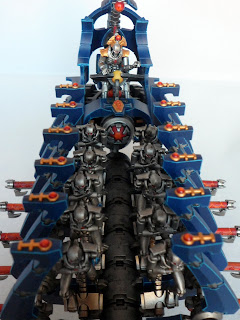
So, the Destroyer Cult has now been completed except for the optional Heavy Destroyers using the converted Heavy Gauss Cannons I made. More Immortals, Tomb Blades for the Reclamation Legion bonuses and some eventual dirty Canoptek Wraiths to keep expanding the Necron force. Cheers, Siph.
Blog Widget by LinkWithin