29 Jun 2015

Terrain and Scenery - Plasma Obliterator Finished

Hello Folks, thanks for stopping by. Here is my latest addition to the scenery on my games table, the Limited Edition GW Plasma Obliterator! I got this kit, opened it and for once got on with it and actually painted it rather than have it sitting there for ages as grey plastic scenery but took me a while to get it posted! Lord Halfpenny if you are reading.... you have lots to do. The GW release of Leadbelcher, Zandri Dust and Rhinox Hide in a spray can should speed buildings up nicely.
I opted for a rather worn torn drab colour scheme to match my Bastion and away from the garish GW scheme of bright blues and golds. Although the relief panels deserved some gold, mine is Brazen Brass (old... Dwarf Bronze or now Hashut Copper) undercoat, Shining Gold (Gehennas Gold), Devlan Mud Wash (Agrax Earthshade), drybrush Shining Gold and then Mithril Silver (Runefang Steel). The rest of the panels are spray can Leadbelcher and washes with some nice Typhus Corrosion on parts to show age. I dry brushed the very bottom to match the Calthan Brown on all my bases.
The blue plasma coils were fun to do, but the photo has washed out some of the graduation from Ultramarine Blue (Altdorf Guard Blue) to Lothern Blue and Skink Blue drybrush and blend of White Scar and Skink Blue. I kept the palette quite small with touches of colour for red lenses and white Aquilas so not to distract from the main party - plasma blue!
I suppose it wouldn't be the Imperium if they didn't embellish the power of the Emperor made manifest with some gold!
I'm looking forward to using this on a battlefield soon! It should make a nasty white hot plasma burn mark on someones forces! Hope you like and thanks for reading.

23 Jun 2015

Weathered Metal Painting (Iron Warriors style) Tutorial

Hi all, in the past we have had a few comments asking about how I paint the metallics and weathered paint effect on the Warhound and my Iron Warriors, so I thought I would throw up a tutorial. I'm not saying I am a great painter and this is the right/most effective way to do it (I am sure there are other, better techniques and you might be able to miss a step or two) but this is the process I have nailed down and am happy with after quite a bit of trial and error.

Conveniently, I have a Sicaran that needs painting up, so I'll be using this in the example.

To start with, you need your metallic paints - I used to go off the 3 shade rule, using a dark, mid and light version of the colour to give shade and highlights - which completely works and I still do for infantry models - but for the bigger stuff I have added a mid-light shade for a bit more detail.

The colours I use (in lighting order) are Vallejo Gun Metal Grey, Vallejo Oily Steel, Citadel Ironbreaker (the optional one) and Citadel Runefang Steel. You can substitute them out for different brands - the idea is that they are just different shades.

All drybrushing on this example was using Citadels terrain (or big-ass) drybrush. It seems waaaay to big at first but gives a more consistent result than drybrushing big flat areas with a smaller 'large' drybrush. Infantry/samller mini's obviously requires a smaller drybrush.
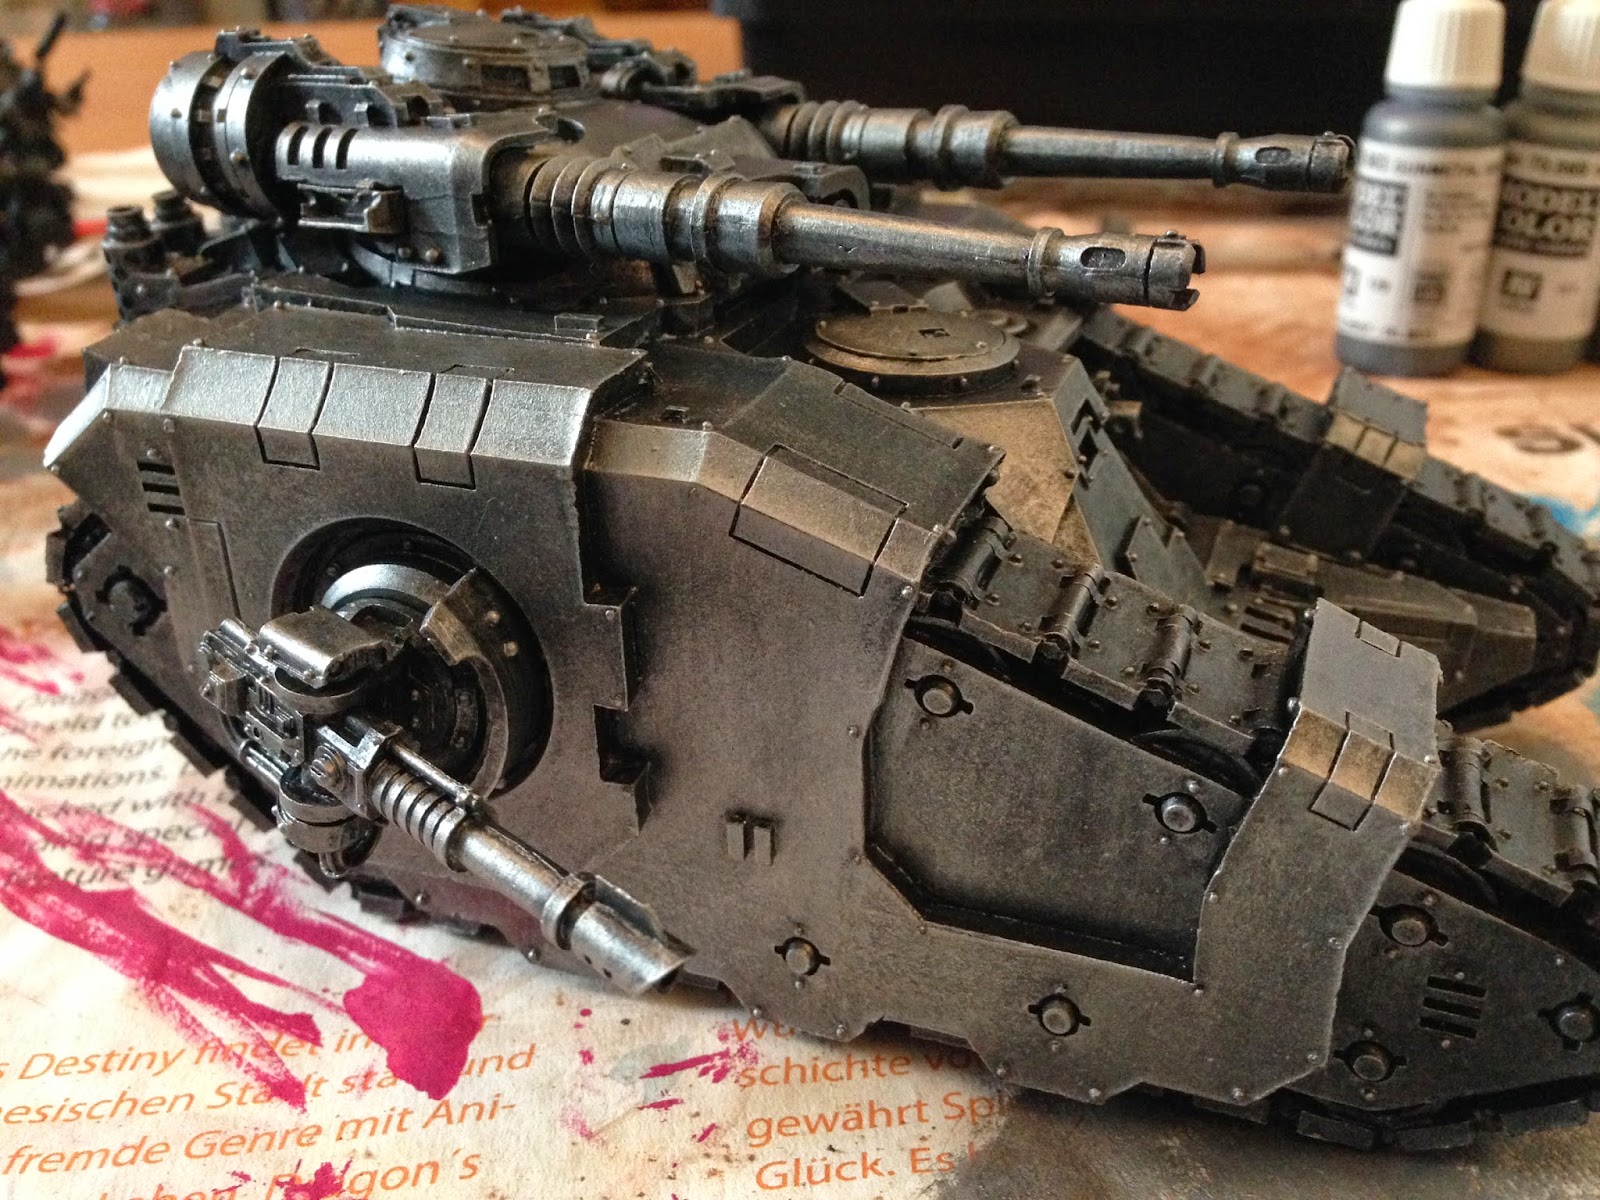
Over a black undercoat, give the mini a basecoat of thinned Gunmetal Grey. You aren't after a perfect coat - just get a single layer on.
After that, give the entire thing a wash with black (Nuln Oil or similar). Again, this is just to darken areas ahead of the next step, so it doesn't have to be perfect.
Now overbrush (a bit more paint on the brush than drybrushing) the entire model with Gunmetal Grey. This is going to give you the good basecoat you want and create shadows in recesses where the black wash has pooled. I did this to the entire model as this will be the base of all the metal areas of the model.
Next, drybrush with Oily Steel - this is going to brighten all the metallics. Its good if this is 'patchy' (a bad word, but a few strokes that are too heavy or light will start to give the surface some uneven  texture you are after). At this point I was only painting the outer armour of the tank - I want the treads darker and waeathered, so didn't touch them and the inner armour parts are going to be painted with chevrons later, so I didn't focus/worry about them.
The optional step - a light drybrush with Ironbreaker to highlight the edges and add a few more 'scratches'.
I usually roll the next two steps into one, but took time to split them out to show you all better. So here I line-highlighted every edge and line with Runefang Steel.
Then I went back with Runefang Steel and painted in scratches all of the metallics. I tried to focus on exposed edges where the tracks would throw up debris to cause scratches, or where impact strikes might happen from bullets etc. Less is more with these - also, try to use a really thin brush and keep scratches fine.
With the silver metallics pretty much done now, I throw down the other metallics I will be using - in this case some golds and bronzes.
 These are worked-up in exactly the same way using lighter bronzes/golds and finished with a Runefang highlight.
 
Now we are starting on the distressed paint - with this being Iron Warriors, there will obviously be hazard stripes, so the base yellow goes down first.
Next up, I simply draw the stripes on by hand using a pencil. You could use masking tape or rulers, but I've found that because the paintjob is going to be distressed later, a half-decent freehand straight line does the job fine.
The black lines are painted on - again, just a freehand straight line is fine for this.
Ok - now to start messing up the paintwork. With a brown paint (I use Mournfang Brown), throw down a layer that will form the basis of the damaged paint - I focus on the edges of surfaces and around the tracks, but also try and spread down to open, flat surfaces to break them up a bit. I use an old knackered brush and stiple it it on (the splayed hairs nicely add to the effect).
Going back to the metallics, starting with the darker metal start stipling with a smaller brush over the brown. You aren't aiming to completely cover the brown (you might need a fine detail brush to add some spots in the middle of any smaller brown areas).
Next it's the mid-metallic, stipling again, but probably applying about half as much as previously.
Finally its the lightest metallic, adding only a little with a fine detail brush to mark the surface scratches.
Ok, that's the metallics finished - I try and tie everything together with a wash of Agrax - it will bring all the colours down and take away some of the brighter metallics (try not to let it collect or become patchy).
Now onto the mud; I use Dark Earth weathering powders by Secret Weapon Miniatures, mixing with some matt acrylic medium to form a cross between a paint and a paste (you are going to be painting it on loosely, but its good to have a few clumps of thicker powder/paint for texture).

Using a pretty big old knackered brush, I stiple the mix onto the tracks and anywhere I think mud is going to fly off onto the tank.
Once dry, I finish the model with some dry weathering powder, applied over the muddy parts and into crevasses/areas of the tank where I think dust will collect. I try and brush some onto flatter areas to break them up again. Then its just a matter of a quick shot with Purity Seal to seal the weathering powder onto the mini and the jobs done!
Hope you like the effect and you find this useful, as ever C&Cs are appreciated.

Thanks for dropping by folks!.

19 Jun 2015

Iron Warriors Lord of Iron (Lord of Skulls Conversion)

Hi peoples - today I am showing off the Lord of Iron; my Lord of Skulls conversion.
When Alex opened up Blog Wars 9 to super heavy Lords of War, I decided I wanted to to take one of these to mix things up (turns out its not great in tournaments). The problem is, the model is a bit meh... I really didn't like the static pose and tbh I'm not a fan of Khorne, so would have to paint mine completely differently.

So - first up, the conversion work.There were a number of basic changes and a few bits of rebuild. First up, the head; I really wanted the model to have an Iron Warriors mask, but I'm not that great with greenstuff, so ended up just using the head without the horns/trim.
One of the small circular shoulder crests got removed and replaced with an Iron Warriors skull that was greenstuff cast off of a set of Forgeworld doors.

Some Assault Cannons were cut down and added to the waist - you know, just because...

The dozerblade previously was covered in skulls and spikes, so the spikes got removed and plasticard used to make a more traditional flat dozerblade surface.

I had already decided to change the blood vats on the back and liked the idea of it being a bit of a gun-carriage, so used some spare parts from a Baneblade kit to add some Heavy Stubbers and a few missiles.A beaten-up shield from a Dreadknight was added as a trophy from its first game where it smashed apart a GK/Knight army.
Finally the weapon; I felt that the Axe wasn't very Iron Warrior-y, so used one of the unused blood vats and added a few spikes here and there.The pole is made from some spare cabling from my Warhound (which goes to show the size of some of the parts on titans...).
From a painting point of view, I treated the model like any other Iron Warrior vehicle (a tutorial is coming soon - I promise!), using the same chevron style on the shoulder pad and dozerblade to fit the theme of the rest of my army.
The model is full of vents as well,. so I really wanted to push the glowing-effects, trying to make it look like it was fuelled from within by some sort of daemon-fire. I hope it comes across ok...
Anyway, I hope you all like it - apologies for the crap backdrop, I really need to get a better photo-kit if I am going to be painting up many more big mini's - an A3 backdrop just doesn't cut it with these... As always C&Cs are appreciated.

17 Jun 2015

Blog Wars 9 - the 6th degree's Summary

Hi people, we've been back from Blog Wars 9 for a while now and I know I'm late getting a report up...


How did it go? A strange combination of super fun games and awfully... Basically the great Lord of Skulls experiment was a massive failure  - but onto that later. My list is here for you to peruse.

As normal, Alex did another great job of organising the tournament - everything went smoothly, food was good and there was a really good turnout.

Game 1 I went up against Ryan with a Sisters army - madness who runs Sisters???!! The game was kill points and it was hammer and anvil deployment. I don't think I've ever played them before - so in my mind they were Space Marines with slightly worse stats and flamers. I was wrong. I have literally never played against so much AP1. I think there was something like 16 meltas, a few multi-meltas and 3 D6 shots from Executioners tanks.

Ryan set up as far away as possible, meaning the Lord of Skulls would need a couple of turns to get into combat and lots of melta went into reserve. Needless to say, by Turn 2 the Lord of Skulls was a smoking wreck, the Obliterators were obliterated and the cultists were a fine paste. Abaddon managed to drop in kill a few guys, but there are only so many invun saves you can fail and by Turn 4 I was tabled with an appalling score of around 178 - 1950.

Game 2 and I was bottom table, but at least that's where the fun games normally are. I went up against Andy with his Imperial Guard in an objectives game. Andy had a pretty rounded and fluffy list (although I don't know IG so couldn't say why...) with a few Leman Russ', Hellhounds and Vet squads. Amusingly - no melta.

Andy immediately saw my two squishy Cultist squads and tried to target them, whereas I sent my Lord of Skulls to roll around squishing stuff - which it did with aplomb! It managed to take off a couple of units a turn in a very point and click fashion, but by the end of the game we were both sat on our own objectives and Andy managed to take the win by a couple of secondary VPs.

Game 3 and I managed to move up to second to bottom table (woot), against Daniel with his Grey Knights and Inquisition. This was Maelstrom and despite lots of hard hitting units, Daniel had pretty much nothing to touch my Lord of Skulls. Daniel managed to take an early lead, getting a few decent objectives and having the manpower and armour to grab mid-table objectives - blocking me from accessing them with my more squishy Cultists. By Turn 3 I had managed to blunt his army with the Lord of Skulls, Obliterators and Abaddon, but not in time to catch up and the rest of the game was the Lord of Skulls rolling round smashing stuff again (and ending with the full 9HPs). I ended up losing about 10-6.

These three stellar performances left me 47th out of 48...not my finest hour, but I can confidently blame it on my list looking at normal results. So, why did it go so wrong? Basically because the Lord of Skulls is stupidly overpriced; it was 1013pts, for which I could literally remove any unit I got into combat with (it consistently caused around 20 unsavable wounds/HPs). Shooting-wise it looks good, but the Baleflamer Hellstorm template didn't get used until at least Turn 2 each game, which meant that Skullhurler was being relied on. Both weapons are S9 AP3, which looks good on paper and reliably hurt vehicles, but AP3 meant that I was only ever stripping single HPs and anything with a 2+ save was laughing. Oh and 65pts for instant death with the Baleflamer wasn't used once (I shot some Dreadknights with it, but they passed their saves easily).

So, whilst the Lord of Skulls was rolling around fluffing its shooting and then overkilling in combat, the other 800pts of my army was pretty fragile, unsupported and useless at claiming/holding objectives. So basically - Lord of Skulls is getting shelved until we play more Apoc and in future I will take a sensible list...maybe next time I will take a more sensible list to a tournament.

15 Jun 2015

Blog Wars 9 Lord Halfpenny Battles (Picture Heavy)

Hi one and all,

So the dust settles after another amazing Blog Wars tournament. Thanks again to Alex over at fromthefang for arranging the event. I decided to opted to take a combination of 3 Imperial Knights, and Beilal and 2 squads of Deathwing terminators - one being a squad of Deathwing Knights.

The three battles I fought were:
  1. Dave Weston with his Tyranid Force from http://40kaddict.blogspot.co.uk/
  2. Gary Hoptroff with his Blood Angels and Imperial Knight
  3. Peter Barrett with a Necron Decurion Detachment
I did plan on taking loads of notes, and images - however in the swing of the games notes when by the wayside - I'm adding in a few of the highlights from each game.

Game 1.

I really enjoyed the battle with Dave, I've fought Tyranids for Years, with the6thdegree having a 'nid army since we were 'kids' also having an Ultramarine force, I like nothing better than squishing a few bugs. My force included 4 new 'untested' units, would they suffer the normal 'new unit' syndrome and die before turn 3?? This game took place on the 'top table' this was the luck of the draw, but it felt good to be at the top of the pile..
  • all 3 knights moved forward throughout the game, finally getting into combat and destroying everything in sight
  • The knight Paladin 'Calgar' turned back to attack the Genestealers, this however cost him his life as the GS took his final HP in combat - the blast wiped out 2 full squads of GS
  • Terminators hack their way though the Tyranid lines, their numbers slowly getting whittled down
  • Lord Daverous mounts the skyshield and destroys the Xenos hiding there - killing the Tervigon in single combat- killing Gaunts in the process- the carcass of the Terv is throw at the Zenothrope causing a wound.
The games ends with a win to the Knights/Dark Angels. 1335 to 600 


Game 2

The second game saw me coming up against Gary with a Knight the first time I've ever faced a knight!- how would my knights do? the battle was over the 3 relics- My Dark Angels were prepped for a Turn 1 arrival. Gary only deployed the Knight, the Dante and Blood Angels all in reserve.
  • Combined fire from the Knights and Deathwing Assault Cannon reduced the Knight to 1 HP
  • The Knight charged the Deathwing Knights, who smashed it in single combat with the maces in 'smite' mode
  • Remaining Blood Angels force arrives- however all are slowly taken out by fire from the knights and Dark Angels in combat
  • Dante is killed under the boot of Sir Calgar- having been reduced to 4 HP
  • Death Company and Scouts are blasted off the board
  •  Tabled by Turn 5- all objectives secured
The Game ends with a score of 30 to 0


Game 3

The final game, one table 3- Thoughts turned to a good win and maybe getting inside the top 5- however my greatest fear sat waiting for me.. Necrons.. The game with Peter was really good fun, however my rolling deserted me in this game, losing 2 knights in quick succession. The game was the Maelstrom format, meaning objectives were picked each turn. I really enjoyed this game- even though I got my shine Knight arse handed to me..

  • Sir Calgar and Kirk taken out under heavy Gauss fire
  • Both armies successful in claiming several objectives
  • towards Turn 3 the Knight/Dark Angel force was limited, allowing free access for the Necron force to claim objectives
The game finished 7- 13, a lot closer than I feared after the 2 knights died by Turn 2..


Overall a great Event, I finished in 11th out of 48- not a bad effort. The games were great fun, and thoroughly enjoyable. Knights are very good, however they do have several weaknesses. Gauss and rending claws are one of them!

Now what should I have ready for Blog Wars 10...
Blog Widget by LinkWithin