31 Dec 2015

Legio Astorum - Warlord Titan Build - WIP #8 - Main Torso

Hello Avid Titan Builders, hopefully you'll find these post of interest, thanks for dropping in.

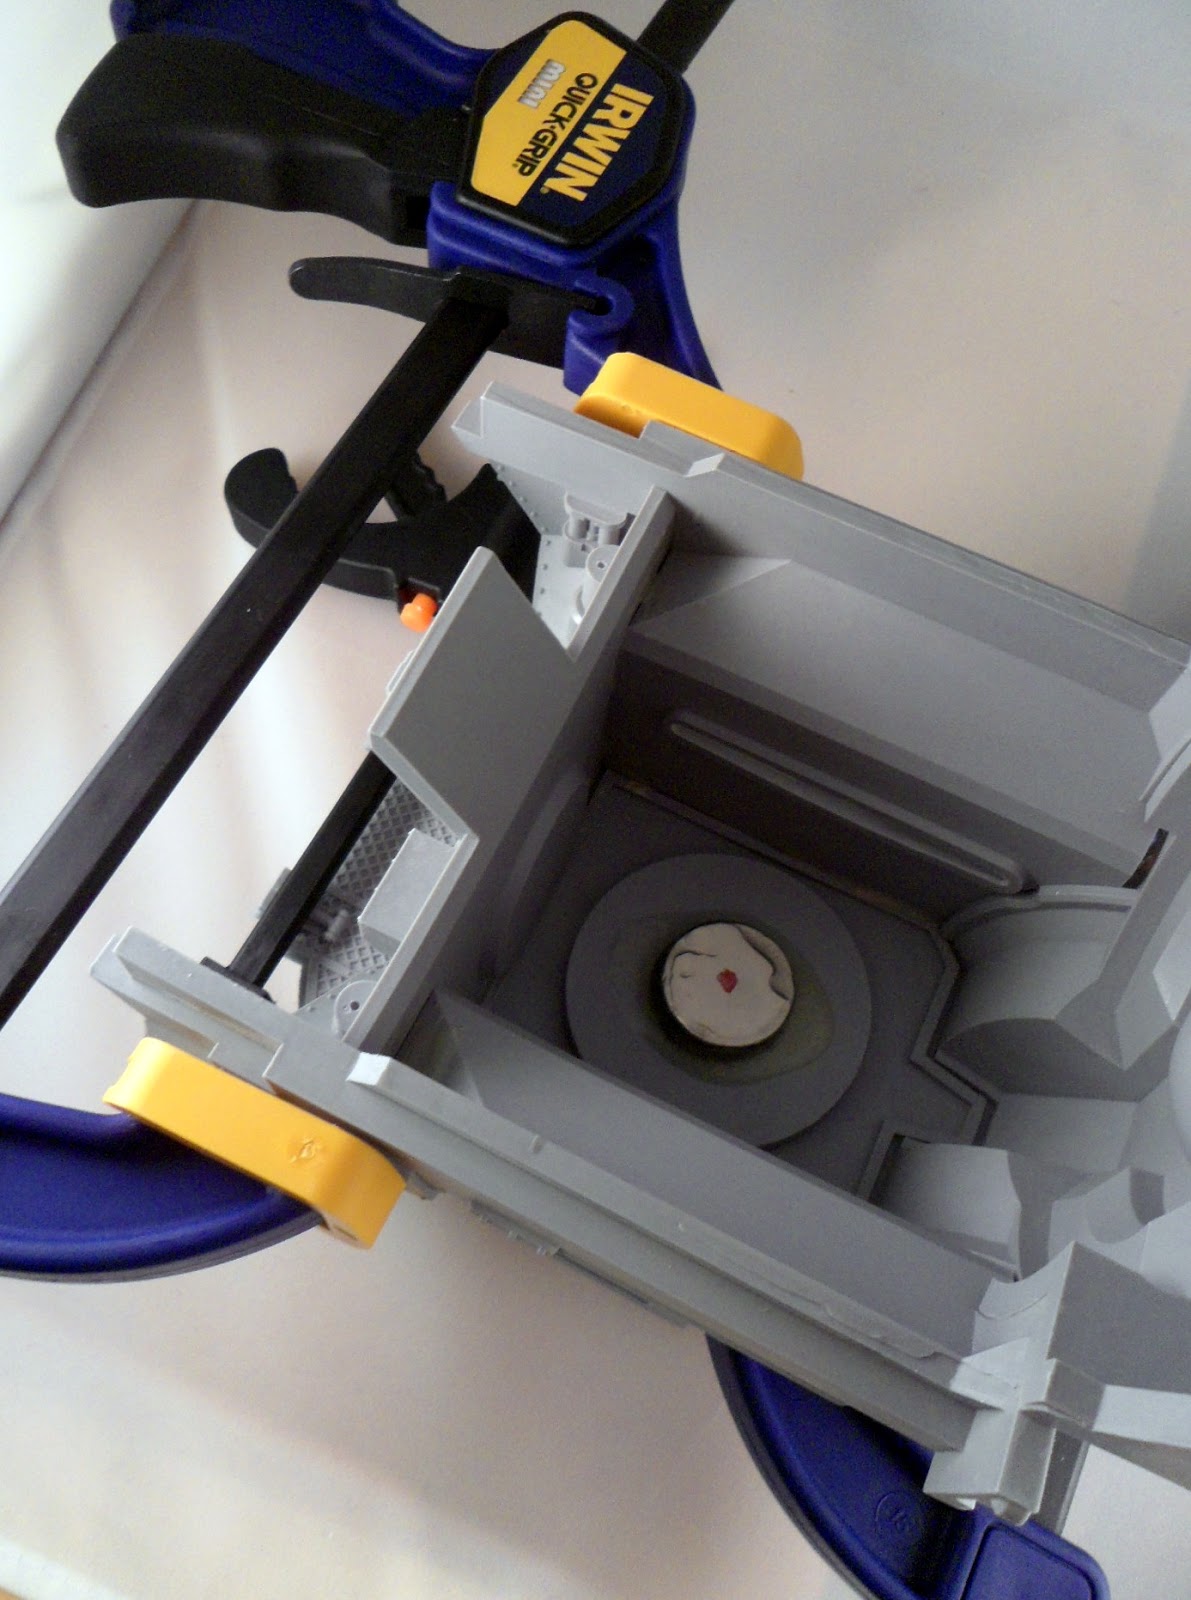
Right, here we have the main torso of the titan, I started off following the instructions, using the Torso Lower Rear and the Front Plate as guide pieces, just gluing the two Torso Lower side pieces first. Separate to this, glue the two Upper Rear Torso pieces together, this is an important precursor, and should be done a day in advance of the Torso, this will be used as a guide piece later for the sides and will prevent it drooping. If you attempt the Torso rear without these pieces glued together the whole Torso could miss-align as this piece droops and then fitting the Exhaust Vents and lid Carapace will be more difficult.

I then started the boxing in of the Torso itself, glued the lower rear to the Torso Base Plate along with the two Lower Side Pieces - (First photo above shows what I mean too). The Torso Front piece is also just as a guide, not glued at this stage, and enables you to clamp the pieces into the correct shape.
Once the three lower pieces were dry, the next day I set about gluing the Torso Upper Rear pieces which I did earlier, shown above, you can see the glue in between these in the top left of the picture, these are now one solid piece. These will also be pinned for strength and integrity.
The model provides great areas for these pins.
The two Rear Upper Pieces glued earlier can now slot into place without drooping. You can see the Pin holes and where they line up with the Rear Lower Torso piece to make a super strong base of the Torso main body.
Here you can see the two constructed rear pieces now in position ready for gluing and pinning finally to the Rear Torso piece and the two Lower Sides. This was left overnight to dry. The Upper Side Torso Plate (the big curved one) is there as a guide at this stage, to make sure I am not messing it up.
Next, the two large curved Torso Upper Side pieces were held in place by dry fitting the Carapace lid to ensure the correct angles and joins. The side pieces were then clamped in place whilst the glue dried. The top Carapace is not glued, just used as a guide.
So now the Torso should look something like this. Getting there, now the side panels are sturdy and dried, next the Torso Front Plate will be fitted. Ensure everything is sturdy and dry before attempting the final side of the main body box - it should be a tight close fit so some leverage will be required, hence leave these to dry completely before manipulating the final piece into place.
Here is the Torso Front Plate being fitted, this is why the rest needs to be completely dry and sturdy before attempting the front piece, it will be a tight fit and to ensure a tight bond the clamps will need to be used so everything is close and neat and tidy.  If you are attempting the whole Torso in a day, these clamps will quickly undo all your hard work and alignments, so take your time and use the next pieces as a guide for the first and repeat the piece by piece construction - slowly.

The instructions then have you fitting the 'lid' next, but I want to ensure the shoulders are pinned internally to prevent possible arm "droopage", leaving it off means I can get to the internal sides of the large curved Upper Torso Side plates and correctly drill guide holes for pins, so I am leaving off the Carapace lid for now.
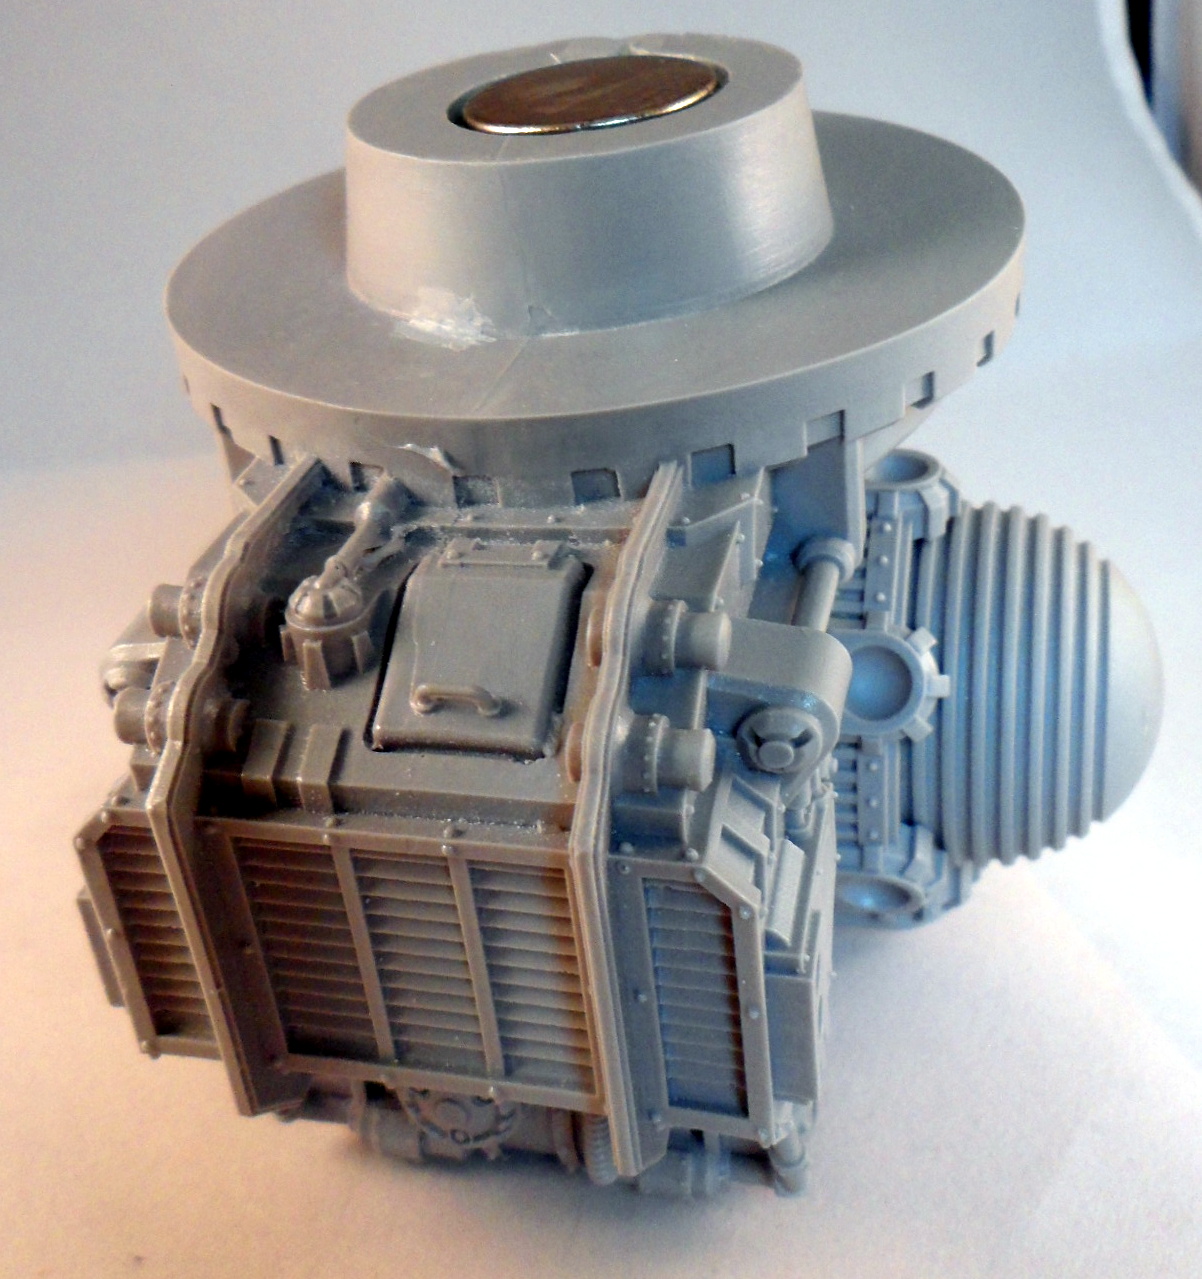
Finally, (for my Torso) the main parts of the Torso are complete (with exception of the Carapace 'lid', Carapace Armour Panel and Void Exhausts) by fitting the Stabilizers and mountings for the four Secondary Weapons and Chest Armour Plate Mountings.

This is shaping up to be a massive model, the words 'Miniature' do not apply to this beast! I am enjoying the slow build, it is awesome fun and everyday I have another glued section or piece to add.

Thanks for dropping in, hopefully your New Year's Eve celebrations are enjoyable whatever you get up to. From all of us at Weemen, we wish you a prosperous and Weeman filled New Year!

A useful link to the Warlord Titan Construction process can be found HERE.

28 Dec 2015

Legio Astorum - Warlord Titan Build - WIP #7 - Finishing off the Legs

Hello Avid Titan Fans, I have been busy finishing off the titan legs, I made sure I slowed the build down and double checked the parts before gluing, and after each glue, I set it aside for 24hrs to properly fix, it's firm fixed after 5mins but I want super strong fixed! Here is testing the pose, a Dettol bottle was the perfect height to rest the hips on to allow lining up and testing.
I bought a simple spirit bubble level to check the pose, an upright set of hips and waist will not put stress on on or the other leg so they share the top weight of that huge torso and arms.
One final check before gluing commenced.
Once glued, I clamped carefully, avoiding moving the joints, this was quite fiddly and took the time that the glue starts to harden, once this happened the job became easier as the clamps wouldn't try to straighten the angles etc.
Here is a pic of the scoring I did on the hip ball joints before gluing, to maximise thesurface area to glue and form a better join.
I did the same to the hip sockets too. I just use the back edge of the sprue clippers.
And here is the result, a nice manly walking pose with the legs slightly apart to allow passage of the toes past eachother. The pistons (12 of them) were done over a course of 3 days, each day doing a set of pistons and leaving the legs to set before the next set, otherwise they might fall out of the sockets. These pistons were cut to size for the top of the legs where the gap is smaller, test fit before cutting and make sure you site them into the correct sockets. These pistons further support and steady the hip sockets so now there is 7 points of contact for each leg to the hips, hence the earlier step of gluing the hip piston ring.
The trailing foot slightly lifting from the rear as the leg is bought forward.
From the side, I chose mainly for height, the rear leg toes in line with the rear of the front foot, walking, not running but not shuffling either - this is why dry fitting before hand and double checking is important.
And the other side
The next day when completely firm, I drilled right into the hip ball and hip piece with an extra long 11cm drill bit. This will ensure the pin enters the hips as well as the hip ball joint. A second pin could be used at 90 degrees to this one or in paralell if you worry about rotation, but I think the glue is actually sufficient to hold it by itself - the pinning is more for my peace of mind.
Once the pins are glued in place, the horizontal gyros are clamped and glued over the pin site to finish off the legs, well with the exception of the armoured toes and armour plates which will further support the foot ball joint to really make the titan safe and steady.

Thanks for dropping by, I hope someone finds these step by step posts useful. Cheers, Siph.

A useful link to the Warlord Titan Construction process can be found HERE.

27 Dec 2015

Legio Astorum - Warlord Titan Build - WIP #6 - Magnetising the Waist

I hope you all had a good Christmas and Santa bought you Weemen!

So, following the instructions, I had glued the hip ball joints, and departing from the instructions, after some posing of the legs, I glued the hip piston rings in the position I wanted, biggest lug downwards. By gluing the ring, it will add stability and strength to the hip joint and the legs with ten extra points of contact with the legs and the hips in the form of the pistons.

But the titan is so huge, I thought I should make the construction detachable at the waist. I knew from painful experience (Reaver toppled and fell) that trusting gravity was a fools errant, so I bought super powerful magnets 25mm x 10mm with the pulling power of about a small elephant - seriously, I left them near eachother and they flew together chipping one and needing all my strength in my fingers to pull apart without leverage... that will do nicely.
Using the Forstner bit I ordered especially, I slowly drilled out the resin plug, lined with super powerful JB Weld, and glued in the first magnet.
For the Torso base plate, I didn't need to drill out a complete hole, this way the magnets attraction would be slghtly reduced (seriously, don't need all of that pull!) and the magnet would fprever be entombed in the torso and will not pull loose of the JB Weld holding it - not that I think that'll happen, but this gives an ideal pull and an ideal mount.
Before placing the magbet in the recess I applied glue and then held together by the magnets, I applied JB Weld around the top magnet, sealing it in place on the Base Plate.
The hold between the two is more than sufficient to make sure the titan doesn't topple apart but allows some rotation of the waist. and de-construction for transportation if necessary. Ideal.

A useful link to the Warlord Titan Construction process can be found HERE.

24 Dec 2015

Mechanicum Castellax Battle-Automata with Multi-Melta #2

Hello Readers, Thanks for dropping by. Another bit of progress in the Mechanicum front, now I have the Taghmata Army book I know what these Robots can do, quite nifty 4W Monsterous Creatures with Power Blades for extra CC attack at base S6 with Rending. Oh and a Multi-Melta, and two Flamers. Nice.
This one is posed more dynamically, rushing forward to meet the enemy. I've used the Ad Mech transfers to link the Mechanicum units with my Cult Mechanicus units.
And here is a shot of the Maniple so far, another Power Blade wielding one to go and two 'basic' Castellax with Mauler Boltcannons. I love these FW kits.

Thanks for dropping in, I leave you with this festive coloured robot and I hope Santa brings you lots of nice Weemen! Merry Christmas from all at Weemen.

22 Dec 2015

Legio Astorum - Warlord Titan Build - WIP #5 - Legs

Welcome back Titan Builders and Readers, Thanks for dropping in. So, I finished the shins and the pinning of the shins - so next was the legs. The bit I had been putting off, the legs are very important, they convey movement, they support the beast, they carry a lot of weight and they are fairly limited in the variety of poses if you dry fit them (DO dry fit) you'll see that the piston ring around the hips and the ankle piston pieces will limit the stride somewhat.

Firstly I drilled through each side of the upper knee bracket, seperately to ensure when both holes are done they are central and match up.  Next, using these holes as a guide, mark the inner knee cog both sides and drill through this, halfway from both sides, again to ensure a central hole - this hole is for the most important pin, to prevent any movement forward out of the socket.
Once both pieces are drilled and clean, score several marks into both surfaces to be glued, this gives a better surface for the epoxy resin (I use JB Weld Plastic Weld - recommended BIGtime!) to adhere to. I used the dremel to score marks inbetween the knee socket.
Make sure the pin can go right through the holes you have drilled and cut to length using the wire cutters.
I then glued and clamped the legs whilst they dried, not in an upright or load bearing capacity - wait until the legs are done before attaching the feet. I test fitted the pose several times before committing to gluing. The lower 'nut' tab lines up with the lines around the inner knee cog, this leg is at position 3 for the forward leg, the rear leg will be slightly raised and trailing so position 4 worked best for me. Test fit twice! This is the important part - you don't want your titan to look goofy, stumbling or bolt upright rigid (maybe you might- bolt upright, not goofy!).
Here is the dried leg being glued to the forward flat foot, and here you can see my test pose rig, a Dettol bottle (great paint stripper btw) and a clamp to the hips. Not gluing the hip joint until both feet are attached and dried.
And here you can see the rear leg, foot slightly raised, and if you look carefully, the 'nut' tab is at line position number 4.
Once the feet are fully dried and firm, I drilled into the foot and through to the ankle ball joint a deep hole for a long pin. These are the second most important pins on the titan I think, means the stresses of the weight of the titan will be fully supported and spread out into the foot rather than on the ball joint itself.
And here you can see the pin in the bottom of the foot, up into the ankle. I will cap off all the pin holes with a little greenstuff, but this one is in the underside of the foot so doesn't really matter. The central foot being left clear will give me plenty of surface to pin into the base.

Thanks for dropping by. Next up, finishing of the Legs, pinning and magnetizing the Waist, starting to get real height to this 'miniature' now! Siph.

A useful link to the Warlord Titan Construction process can be found HERE.

18 Dec 2015

Legio Astorum - Warlord Titan Build - WIP #4 - Shins

Welcome back avid Titan Enginseers, welcome to Part 4 of this series, I hope you find it useful if you are thinking about constructing your own someday.  Here I have roughed up the surfaces of the shin-knee joint before gluing. This will ensure a super strong bond between the two pieces.
I am using JB Plastic Weld, the best in my opinion, quick drying (5mins) until you don't have to hold together, but 24hrs for a complete set. I have hobby clamps for a great help in keeping the parts together for a strong tight seal. Here you can see the two pieces and how they come together to form the Shin.
To ensure an extra strong bond, I am also pinning all the Titan extremities, and the legs will be taking a lot of weight so I am pinning these two pieces, I am using brass rod and more glue to pin. I used wire cutters, not the sprue clippers to cut the rod and at an angle to get in the best pin (Thanks for the idea from 30mm Madness).
 Here you can see the place to drill, this will be covered up by the armour plates on final construction.
Here is a picture of the drill bit, an extra long 2.5mm bit, next to a normal 2.5mm bit. This means I will be able to drill through the larger deeper pieces such as the hip ball joint into the hips themselves.
A final check and measure of the pin before glue is applied and the pinning put in place. You can also see I've attached the struts from which the Leg Armour plates attach.
Lastly, a picture of the pin in the hole, test fit before adding the glue, the top surface will be well hidden by armour plates, however a little tidy up and paint over the hole and no-one will know you've strengthened the joint. A perfect length and job well done.

I added the mounting pins for the leg armour - don't do this yet unless you position the pins with the armour plates in-situ, otherwise a slight misalignment will mean the underneath shin armour, under the Greave will have an ever so small bend to it - not noticeable on finished titan, but during construction of the Leg Armour I had problems fitting the shins - I'd save the mounting pins until you are mounting the Armour later. A lesson for Warlord No.2 perhaps :)

Hopefully you have found this useful. Thanks for dropping in.

A useful link to the Warlord Titan Construction process can be found HERE.

16 Dec 2015

Adeptus Mechanicus Skitarii Onager Dunecrawler w/ Neutron Laser

Hello Readers and Titan Build Fans, here is my latest offering, not more of the titan, that will appear Friday, but another unit from the bulk blogger buddy buy from Mordian7th! An Adeptus Mechanicus Skitarii Onager Dunecrawler armed with the mighty Neutron Laser and Cognis Heavy Stubber.

As a nod to our own 6thDegree's Iron Warriors, I embelished the base with a holed Iron Warrior's helmet (that'll teach him for wearing MKVII plate instead of MKIII... and a Shoulder Pauldron.
The Onager Dunecrawler itself is Mordian7th's work, great stuff too. I finished off the blue view ports and re did a green power cable to match my own taste, however everything is his good work, thanks Buddy!
This view shows off the nifty Neutron Laser power building up in the coils before release.
And a nice front look, these units on the Battlefield get better in squadrons of 3, with a cumulative 6++ becoming 4++ with two others in close proximity, so I guess I shall purchase two more ;)

Thanks for dropping in and stay tuned for more Warlord Titan goodness, the build is going well.
Blog Widget by LinkWithin